 Home
HomeLog in
Portal
Blog
Main Index
Library Index
Baw Classifieds
Member Portfolios
CraftWorx Index
Assorted Crafts
Candle Making
Ceramics Clay & Pottery
Clipart
Coloring Pages & Stencils
Cricut & Die Cutting
Crochet & Knitting Corner
Embroidery & Cross Stitch
Gardening
Holiday Crafts
Iron On Projects
Jewellery Making
Journaling
Kitchen Crafts
Painting
Paper Crafts
Picaboo
Pipe Cleaner Crafts
Quilting
Scrapbooking
Sewing
Soap Making
Stamping
Tutorials
Web Design
Wood Working
Zentangle
CraftWorx Blog
Baw FAQ
Latest topics
Home-made Texture Paste & Glitter Paste Tutorial
Page 1 of 1

Home-made Texture Paste & Glitter Paste Tutorial
![]() by Archangel Wed Mar 14, 2018 2:16 am
by Archangel Wed Mar 14, 2018 2:16 am

Home-made Texture Paste & Glitter Paste Tutorial By
Hello Everyone!
I have been getting a lot of questions regarding my home-made texture paste, so I thought it was about time I let you in on how I make it. By no means did I invent the concept, but I did spend a lot of time and products perfecting my ratio formula, so I feel that I can call this my own recipe. I have included 3 different versions today, all of which have great uses for different things and all of them are ratio recipes. The advantage of a ratio recipe is you can make as much or as little as you want, all you have to do is change the size of your portion container!!
OK, here we go...
RECIPE #1 - STICKY PASTE
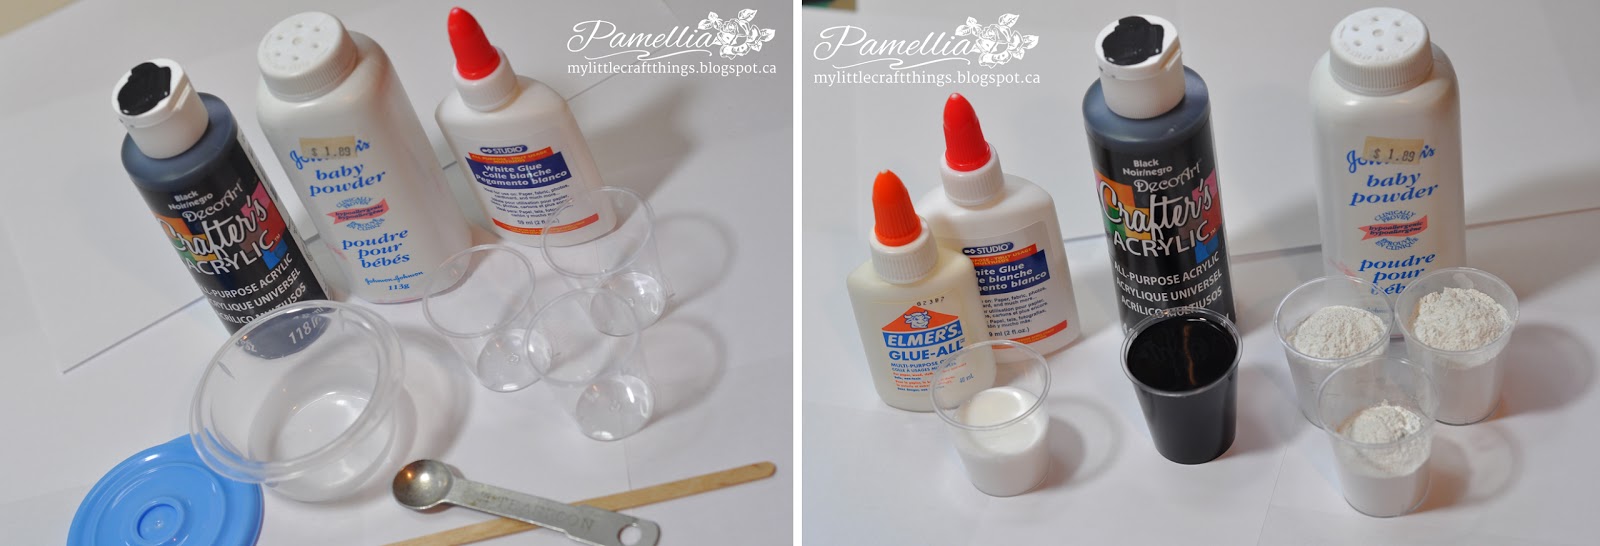
INGREDIENTS:
- Baby powder or talc powder - white, non-scented is always good. The perfume magnifies under heat, so you be the judge of how much time you can spend breathing in those fumes.
- White Glue - cheap, dollar store glue actually works great. The only thing you don't want is glue that dries too fast or glue that is really shiny when it dries.
- Acrylic Paint - again, just some cheap, dollar store paint will do the trick! Nothing fancy required!
- Portion Cups - I use plastic ounce glasses from the party supply store which makes about 1/3 cup of paste
You will also need a container to mix in that can be sealed air tight and something to stir with.
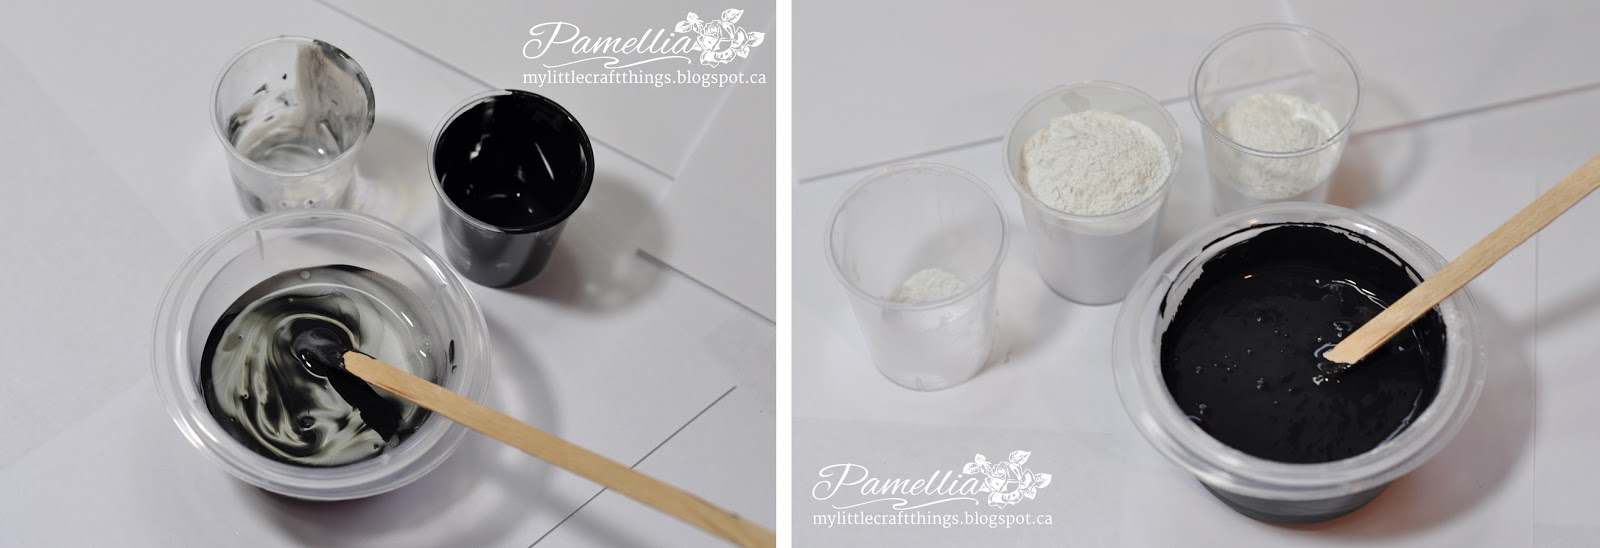
RECIPE:
- 1 portion of paint, 1/2 portion of glue and 2 portions of powder
DIRECTIONS:
- put your wet ingredients in first (the glue and paint), then just like when your making tea biscuits or a pie crust...slowly add the baby powder, making sure to stir well. This will ensure that you get out all of the lumps making it nice and creamy and easier to spread...just like your pastry!!!
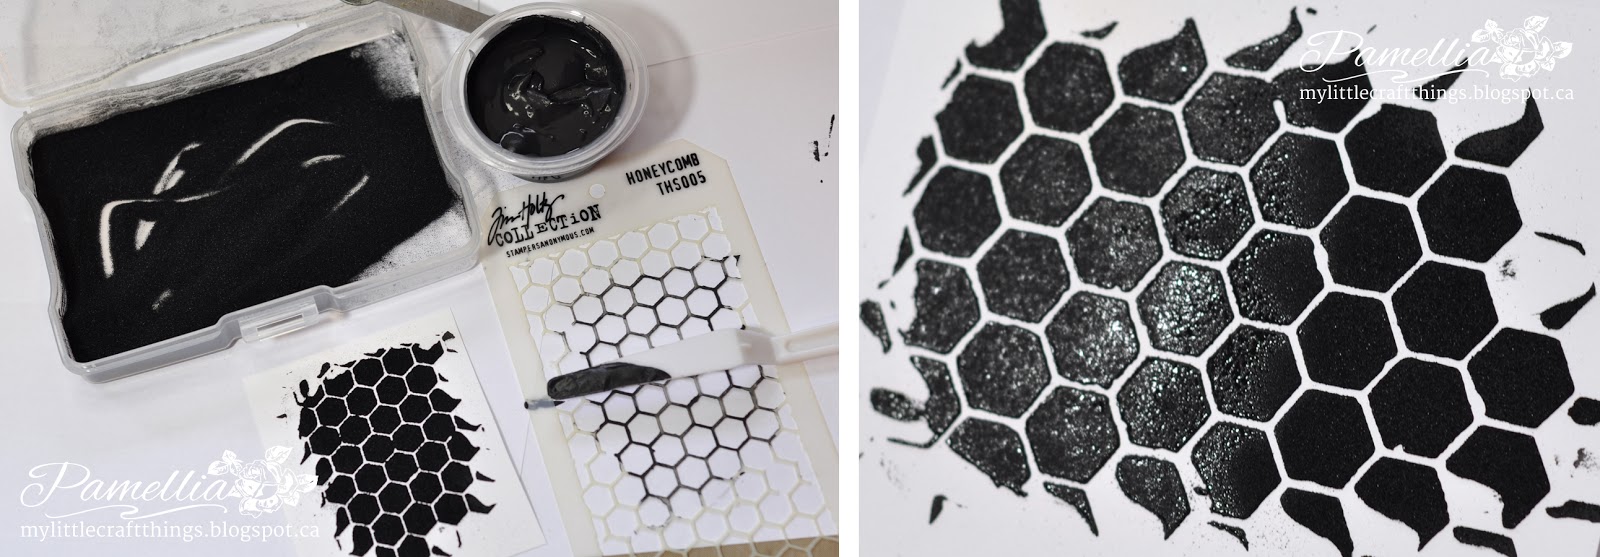
BEST USE FOR STICKY PASTE: This is the paste you want to use if you would like to sprinkle on a little glitter or embossing powder. It is also great if you want a smooth pattern with crisp edges.
PRO'S - It is really smooth, so it spreads easily. It is really wet, so the glitter and embossing powders stick to it really well. Because of the slower drying time, you have leeway for clean up and putting the cap back on. It makes a wonderful, clean, crisp pattern once it dries. Perfect for elegant or CAS style cards.
CON'S - It is really wet, so it takes a lot longer to dry and warps the paper more. You won't get a good texture with it because it isn't stiff enough to maintain peaks and grooves. You also cannot lay it on very thick or it just falls like a badly baked soufflé!
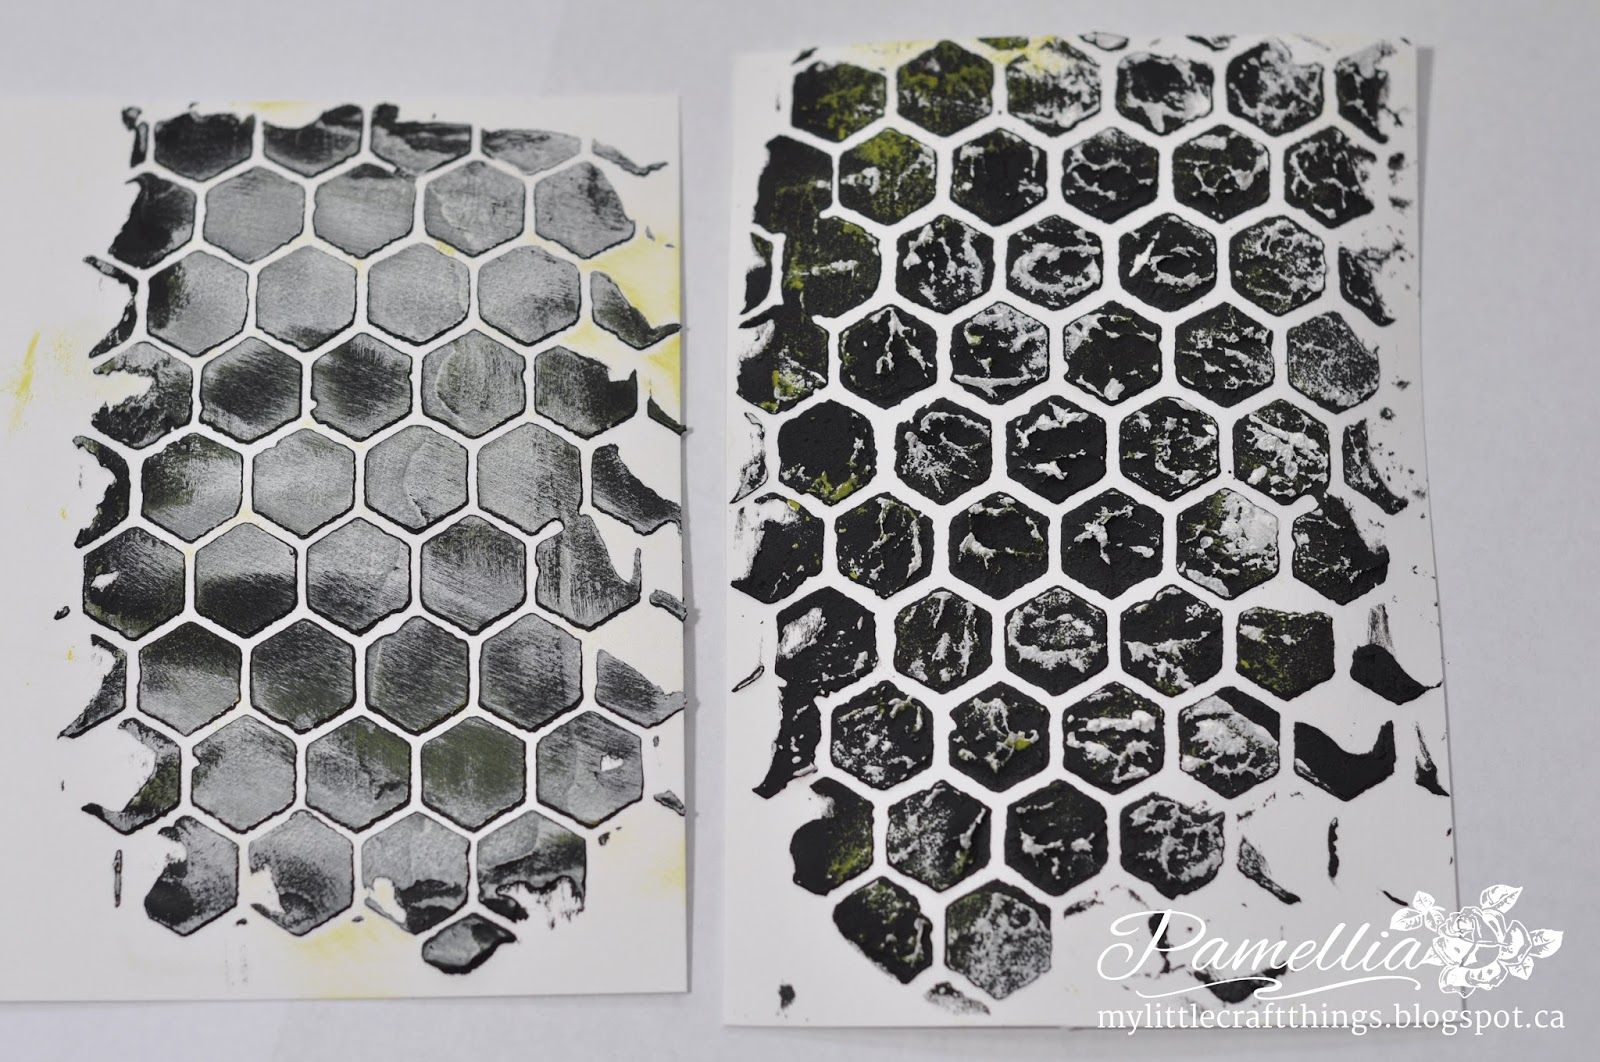
In this sample, I sprinkled on some gunmetal glitter.

In this sample, I sprinkled on black embossing powder. You can get two looks from this. If you leave it the way it is, it has a soft velvety appearance and feel to it. Or you can use your heat gun and melt it like you normally would for a shiny surface (that will also act as a resist to preserve the colour of your paste when you start inking).
If you decide to melt your embossing powder, be sure to wait until your paste is completely dry before taking the heat gun to it. If the paste is still wet, the powder will burn long before it melts. You can see below, half I left as it was and the other half I melted with the heat gun (too soon, I might add) lol.
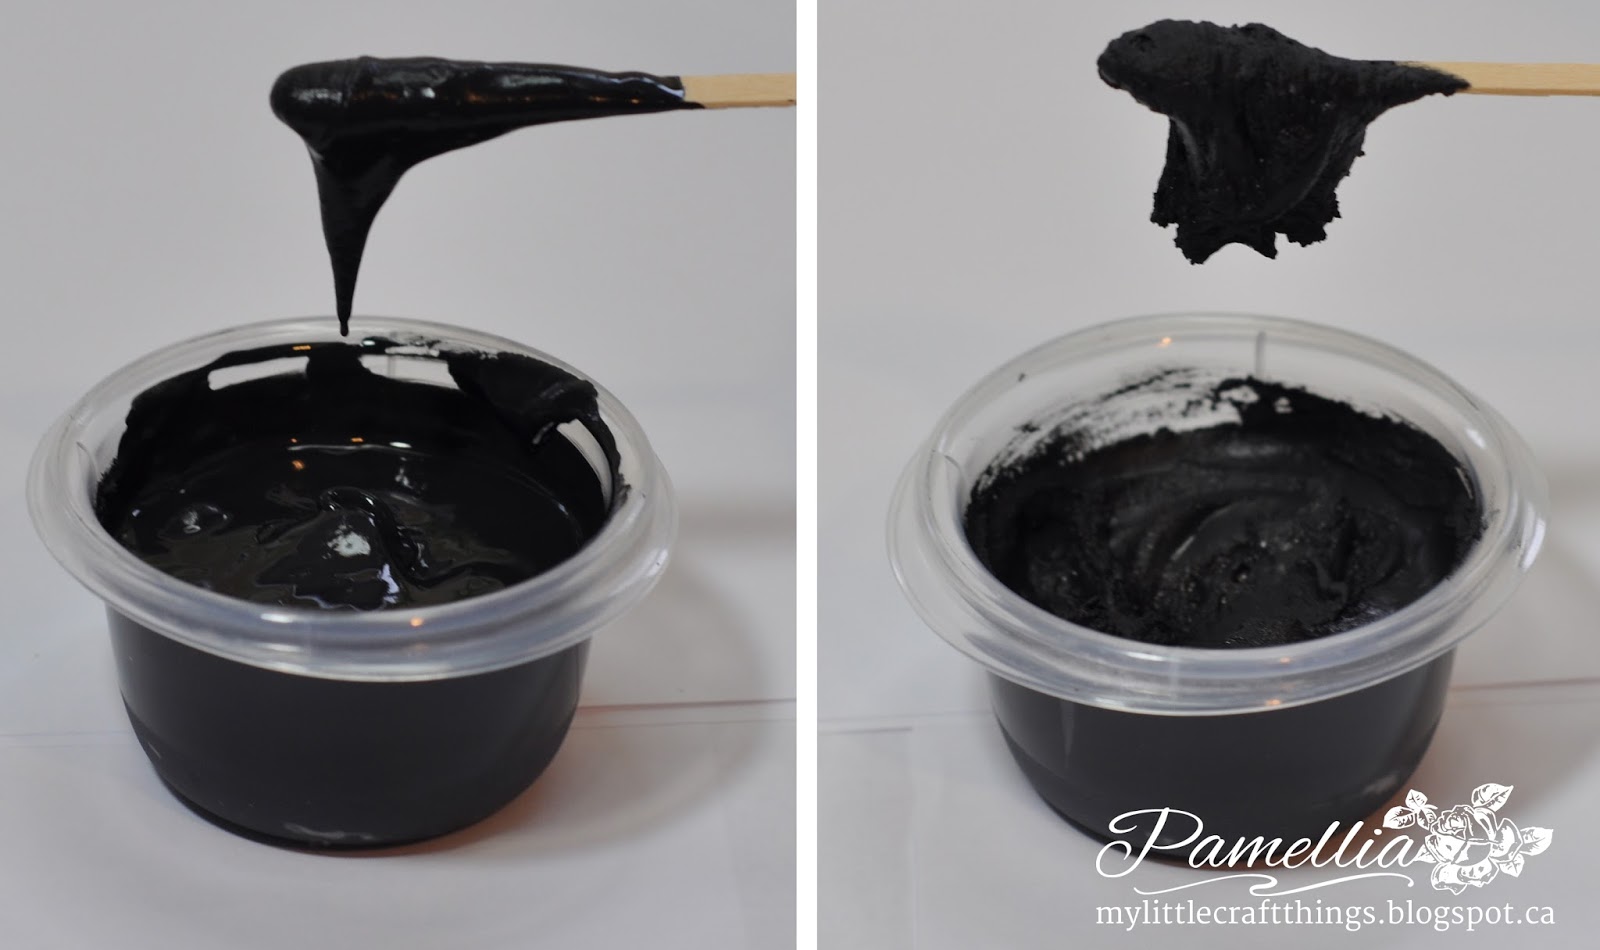
RECIPE #2 - DRY PASTE
The only difference between the recipe for sticky paste and dry paste is that the dry paste has 1/2 portion extra of baby powder added to it (depending on the brands of paint and glue, you may have to add a bit more powder). Here is a shot so you can see the difference in shine and consistency.
BEST USE FOR DRY PASTE: This is the paste you want to use if you are going for texture. It's the base for my bark technique and it also makes great clouds, wood planks, ocean waves and all sorts of other textures.
PRO'S - It has less glue and paint, so the drying time is considerably less than the sticky paste and it also doesn't warp your paper too badly. It's, of course, fantastic for texture and depth because you can lay it on thick and mold it! It looks great on vintage or grungy projects.
CON'S - Don't leave the lid off because it will dry out crazy fast, right in your container! It can be a little harder to spread because it's so thick and pasty - and make sure you wash your stencil right away or it will crust right on.
Here is one done with Sticky Paste and one done with Dry Paste, so you can see the difference in the finished textures. I have spread some yellow and white paint on it to make it easier for you to see.
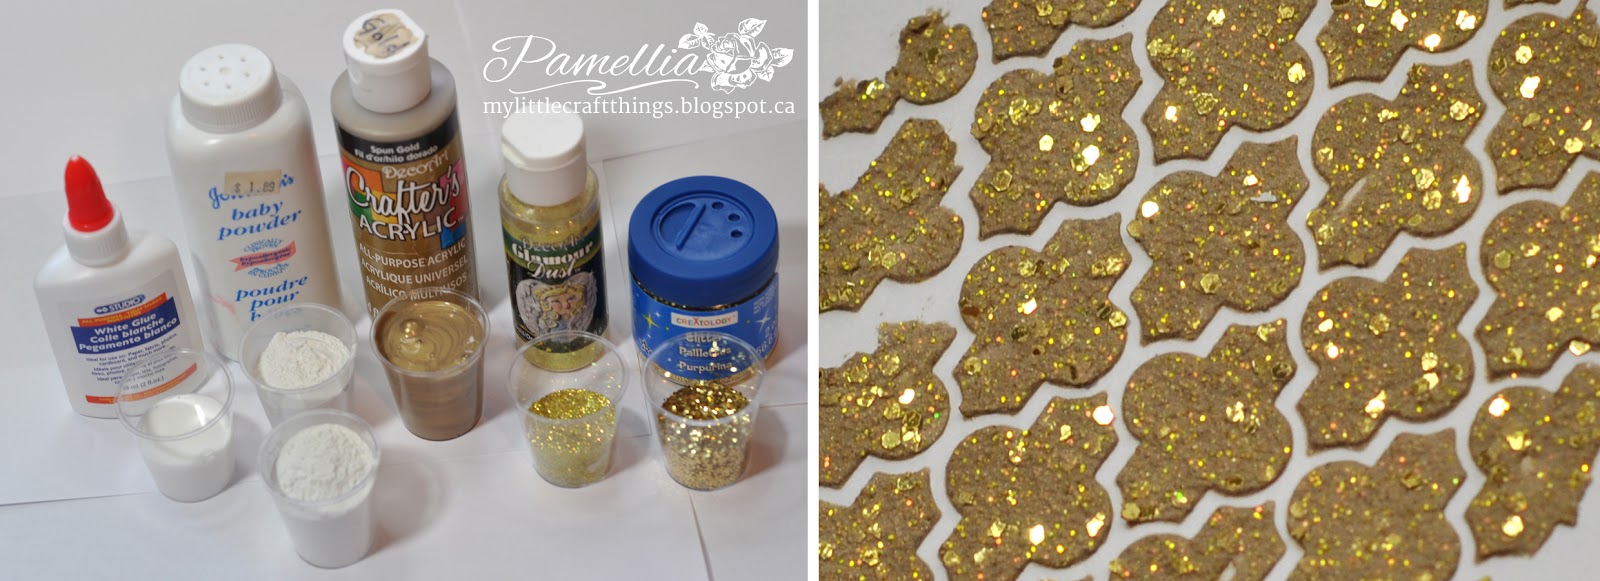
RECIPE #3 - GLITTER PASTE
INGREDIENTS:
- Baby powder or talc powder - same as before.
- White Glue - same as before.
- Metallic or Pearl Paint - again, just cheap acrylic paint is fine. If you don't have metallic, that's ok, it just adds a little extra shimmer is all.
- Fine Glitter - Any brand will do, although the boldest, brightest versions work the best. This is the glitter that will blend in with the paint to give it an overall shimmer.
- Coarse Glitter - The coarse glitter is what will grab the light and really make it sparkle.
For the coarse glitter, I recommend the flat octagon style of glitter. Most cheap glitters for kids crafts will be great for this. I know we all love our Frantage, but those chunks do not spread, they drag and leave gaps in the paste. Tim Holtz distress glitter, I'm sad to say, does not work either. It's not quite sparkly enough and gets coated with the paint, never to be seen again. Here are the glitters that I use...lots of shimmer to them.

RECIPE:
- 1 portion paint, 1/2 portion glue, 2 portions powder, 1/2 portion fine glitter and 1/2 portion coarse glitter
BEST USE FOR DRY PASTE: Christmas, of course, but pretty much any other project too!
PRO'S - You absolutely cannot get a beautiful shimmer and texture like this, simply by sprinkling glitter on top of a product! And as a bonus, it's so freaking cheap, you can make some in every colour!!
CON'S - You may never want to use plain texture paste again!!
In this sample I used pearl paint and iridescent glitters, you should really zoom in and check it out!

Well, I hope you enjoyed my really long winded tutorial! If anyone tries out my recipe and has some success, I would really love to see your projects!! Come on back and leave me a link, so I can swoon over your wonderful creations!
I will be leaving a permanent link on my Tutorials Page, in case you can't find this post.
That's it for today. Thank you for stopping in and for all the amazing comments. I read and appreciate every single one! If you have any questions, please let me know.
Recipe Copied from: http://mylittlecraftthings.blogspot.ca/2014/09/home-made-texture-paste-glitter-paste.html


Archangel-

Number of posts : 343
Age : 49
Location : Ontario, Canada
Registration date : 2008-08-15 -

» Homemade Texture Paste Medium Recipe
» Homemade Glue & Paste Recipes
» Tag Making Tutorial Videos
» Homemade Crackle Paint Tutorial
» Homemade Rubber Stamps Tutorial
» Homemade Glue & Paste Recipes
» Tag Making Tutorial Videos
» Homemade Crackle Paint Tutorial
» Homemade Rubber Stamps Tutorial
Page 1 of 1
Permissions in this forum:
You cannot reply to topics in this forum


» Baw CraftWorx Printable Junk Journals On Etsy
» Welcome Junk Journalers
» Homemade Rubber Stamps Tutorial
» Homemade Glue & Paste Recipes
» Homemade Recipes For Crafting Supplies
» Homemade Texture Paste Medium Recipe
» Homemade Crackle Paint Tutorial
» Home-made Texture Paste & Glitter Paste Tutorial
» Layout 33 Hott Mess
» The Darling Happy Planners
» Baw Craftworx Bible Journal Galleries
» Free Bible Journaling Printables
» Bible Journaling Tutorials
» Bible Journal Links
» Layout 32 Zig-Zags
» Bible Journal Prompts
» I Zentangle Patterns & Stepouts
» B Zentangle Patterns & Stepouts
» A Zentangle Patterns & Stepouts
» 0-9 Zentangle Patterns & Stepouts
» H Zentangle Patterns & Stepouts
» G Zentangle Patterns & Stepouts
» F Zentangle Patterns & Stepouts
» E Zentangle Patterns & Stepouts